The repair is completed, it becomes necessary to connect lighting fixtures to the electrical network. A serious question arises before the home master, how to connect a chandelier with 3 wires. At first glance, the task does not seem too difficult. But if their number of veins coming out of the ceiling is more or less than that of the light source, they are of different colors, then it will be quite problematic for an uninitiated person to figure it out.
Incorrect connection may result in electric shock or short circuit. A job well done will allow you to enjoy the bright light of the lamps.
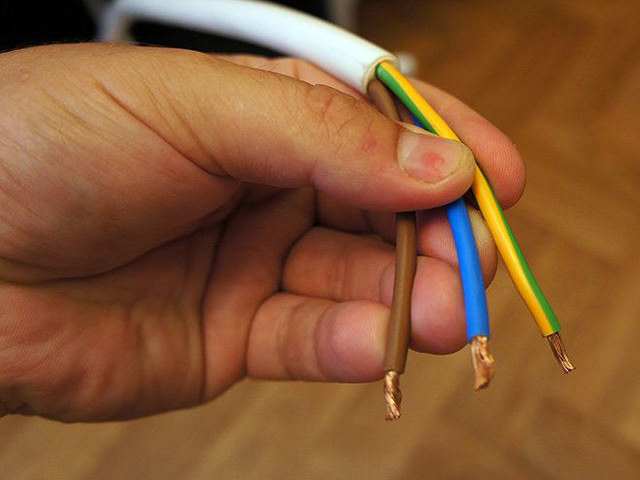
The wiring of a modern apartment is done with a three-wire wire - this is a phase, zero, ground cable. According to the rules established by the European Committee for Electrotechnical Standardization, Russia, European countries, China, the marking is as follows:
- yellow-green, green, yellow - protective zero, the Latin "PE" is put on the diagrams;
- blue tint, indicates the neutrality of the wire (working zero), the designation "N";
- grey, black or brown, carry phase voltage, "L".
It is logical for Russia after 2009, but in other countries the marking may differ, it depends on the date of manufacture of the electrical appliance or indoors. When the construction of the Soviet Union was going on, wiring was laid, in the color available, most often white. Therefore, you need to be able to determine the meaning of the wires inside the chandelier sticking out of the ceiling.
Necessary equipment
Before starting work, prepare the necessary tools:
- voltmeter*;
- ohmmeter*;
- indicator screwdriver;
- cleaning knife;
- pliers;
- insulating tape;
- terminal block;
- electrical insulating tubes (cambric);
- ladder or table.
* These meters are components of multimeters that can also be used to test electrical circuits.

Determining the ownership of conductors
To determine the purpose of the core, to be sure how to connect it correctly, you will have to tinker. With two wires of the same color sticking out of the wall, there is no difficulty. If they are mixed up, the current in the cartridge will not be supplied to the central part, but to the side lobe. The lamps will burn. If there are more conductors, an incorrect connection will not allow the light to light up or it will knock out the introductory machines in the apartment.
The purpose of the conductor is determined with a special indicator screwdriver. One finger is pressed against the end of the device, the tip touches the conductor. The illuminated indicator indicates a phase conductor. Be sure to recheck with the switch off, the light should not light up.
If three separate cables come out of the ceiling, two options are possible:
- a double lighting circuit is used - when different keys of the switch are pressed, different groups of lamps light up;
- a power supply circuit with a protective zero is used - in the event of a short circuit or flooding, a special machine is activated, turning off the electrical energy, preventing electric shock.
In the first case, the check is made with an indicator screwdriver. In the second, you will need a socket with a screwed-in lamp with an attached cable. Having found out the location of the phase, it is connected through a control lamp to the remaining ones, the light is on, the remaining wire is grounding. No - zero.
If you use a voltmeter, it is definitely possible to identify phase and zero terminals. Two phases between themselves will not show a potential difference (voltage 220 V). By applying the multimeter probes between phase and ground, you can see the readings on the display of the device. To carry out the test, the "Voltage" measurement mode is set, the scale is above 220 V.
When there are no measuring instruments, you can find out the value of the cores by disassembling the switch. The neutral wire goes directly to the lighting fixture. The phase conductors pass through the switch keys.
The ends of the conductors are marked as accepted by the standards. To do this, use colored electrical insulating tubes, multi-colored insulating tape. If they are missing, markers can be used.
Checking the wires inside the chandelier
After the purpose of the conductors located on the ceiling has been clarified, it must be repeated in the appliance. The easiest way is to study the passport of the light source, the diagram will indicate the purpose of the conductors. In its absence, you will have to arm yourself with a multimeter and follow the instructions:
- Turn on the device, set the resistance measurement mode or the continuity mode. In the first case, the device, when the outputs are closed, will show values tending to zero. Or emit a beep;
- Light bulbs are unscrewed. Inside the central part of the cartridges, there are phase contacts, zero on the sides. One of the side lobes may not be connected;
- The probe is applied to any zero terminal. Others alternately touch the wires sticking out of the chandelier. The sound signal will show zero, it must be marked with a cambric;
- The phase output is also calculated. Only the probe needs to be attached to the central contact of the cartridge, the core found is marked;
- Then we attach the output of the multimeter to the phase wire, if after checking all the central contacts with the probe, a signal sounds, then the chandelier has one circuit (when power is applied, all the lamps will light up);
- The remaining third wire can play the role of a ground wire. It is checked by a short to the case. Or combine the second group of lamps (two-circuit chandelier).

In accordance with the requirements of the PUE, the wire through which the phase voltage flows must come to the central contact of the cartridge. The switch opens it. To increase the safety of operation, try to adhere to the rule. Many electricians do not perform it.
Before connecting the chandelier, be sure to check for short circuits between the housing, phase and neutral wires. If there are any, the electrical appliance must be disassembled and the identified problems corrected, otherwise its use is prohibited.
Connect the wires correctly
For safe operation, it is necessary to follow simple rules for connecting cores:
- When repairing an electrical appliance, combining conductors in groups, creating double-circuit chandeliers, it is impossible to twist and then wrap it with insulating material. Over time, oxidation will begin, electrical contact will deteriorate, the junction will become heated, and there will be a risk of a fire hazard. To avoid unpleasant consequences, it is necessary to solder the connection;
- It is possible to connect to the cores that come out of the ceiling only through terminal blocks. Recently purchased appliances have similar fixtures; for old fixtures, they are bought at an electrical goods store.
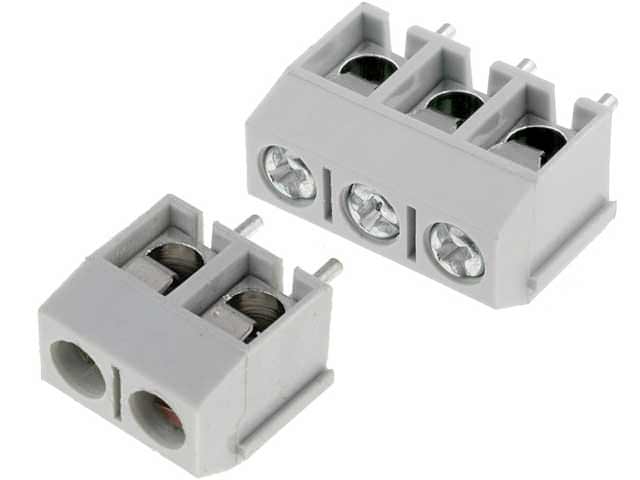
Sometimes situations arise when a group of wires has a larger diameter than the holes at the terminal block. Then it is necessary to fill it with tin, and solder a copper core to it, the cross section of which is at least 0.5 mm 2.
If you plan to install a stretch or false ceiling, you will need to increase the conductors, as the standard length may not be enough. Then the terminal block will help, most importantly in the holes where the conductors fit, tighten the fasteners with the greatest effort.
Before connecting a chandelier with three wires, check whether everything is insulated, that there is no breakdown of electric current on the lamp body. Having completed the study of the ceiling and chandeliers, you can proceed directly to the connection process.
It is important to de-energize the room before starting work. In the apartment, you need to find the appropriate machine, put it in the "Off" position. Be sure to check that the electrical network is not energized using an indicator screwdriver.
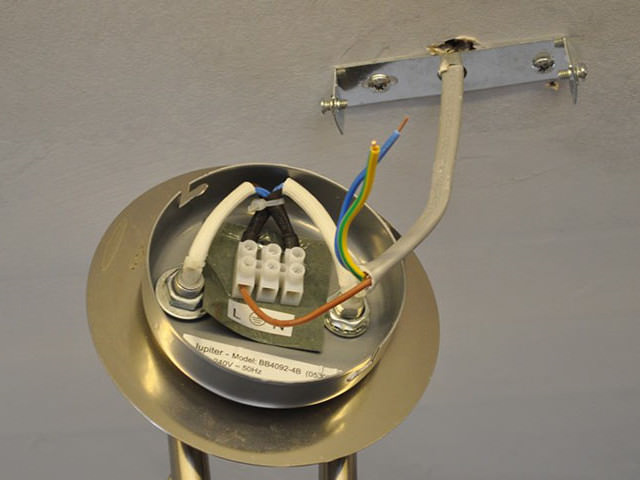
Check if there is a hook or strap on the ceiling for fixing the electrical appliance. The light source must have a structurally provided bracket or chain. Once the chandelier is fixed, you can start connecting electrical wires.
Wiring diagram when two wires exit the ceiling
Chandeliers with one lamp or frame, which is made of plastic parts that do not conduct electrical energy, can have two cores for power. If you follow the following instructions, connection difficulties will not arise:
- The purpose of the cores emerging from the ceiling is being determined;
- If the chandelier is single-circuit, but has three outputs, the “ground” is detected, cut off, completely isolated, it is excluded from the connection process;
- Connection work should begin with "zero" conductors;
- In the presence of two or more circuits, the phase conductors of the luminaire are combined with terminal clamps, a separate output is connected to the electrical network of the house or apartment;
- Power is applied, the result is checked.
The ceiling with a chandelier contains three wires
With this scenario, it is possible that the lamp and apartments are made according to modern standards. A power supply circuit with a protective zero is used. Then it is possible to connect wires matching in color through the terminal block. But it is better to make an additional check, in the electrical network, inside the chandelier. Carry out further actions, according to the instructions for two wires.
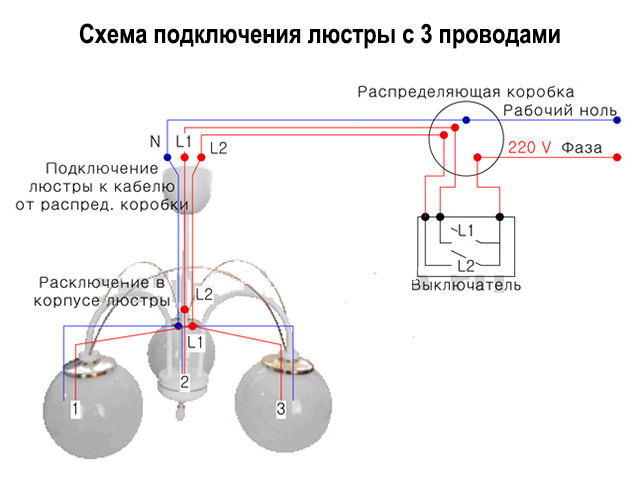
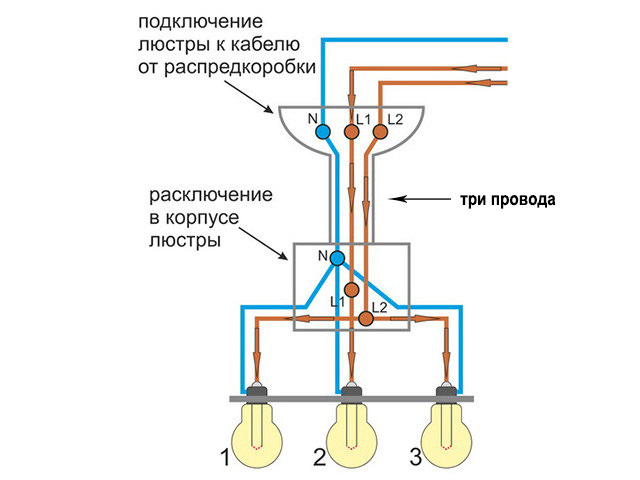
Another layout option, a two-gang switch for a double-circuit chandelier. With it, you can change the strength of the lighting in the room. Including a small or large group of light bulbs or the entire chandelier.
All wires must have different colors and be marked according to existing standards (L1 - first phase, L2 - second, N - zero).
In Russian realities, the condition is rarely met, so it is advisable to play it safe:
- It is necessary to find out which wire is needed for what;
- Phase and neutral wires are marked;
- The supply voltage is turned off, its absence is checked again with an indicator screwdriver;
- The groups of circuits of the lighting device are checked, along the phase conductors;
- The connection of the neutral wire to each of the horns is checked. It connects to the output from the ceiling;
- The last to be connected are the phase conductors, united in groups;
- Voltage is applied and the operation of the chandelier is checked.
Safety
When connecting a chandelier, any electrical work, care must be taken, be extremely careful. Getting an electric shock causes cardiac arrest, a spasm of the respiratory muscles can occur. The rules are quite simple:
- Carrying out any work is carried out only when the power is turned off, even if you need to change the light bulb;
- The voltage is turned off at the common introductory machine of the dwelling. Clicking the switch keys is not enough, since an initially incorrect connection is possible;
- All tools must have handles covered with insulating material, without signs of damage;
- Before starting work, you must make sure with an indicator screwdriver that there is no voltage;
- It is advisable to lay a dielectric mat under your feet, or use a material that does not conduct electricity.

Possibilities of new technological solutions
Progress does not stand still, the counters of retail outlets delight with more and more perfect and life-fitting goods. TV remote control, today you can not surprise anyone. Many have heard of smart homes. Having mastered the process of connecting a chandelier, it becomes possible to take the first step towards an intelligent home.
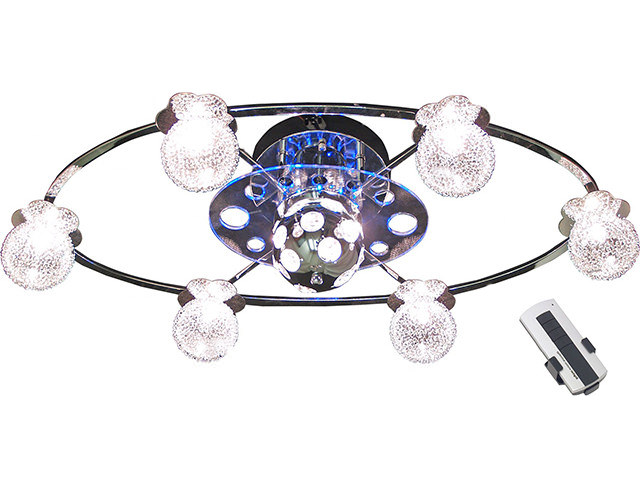
These are chandeliers that are controlled from a switch built into the wall, as well as via a remote control from anywhere in the room. That will add additional comfort, safety. It's nice to turn on the light in the evening without getting up from the sofa, to avoid collision with doors and corners in the dark.
Structurally, these chandeliers differ from conventional lighting fixtures with an additional control element. Installation of the product is almost identical to the connection of standard lighting sources.
In any case, it is advisable to leave an ordinary chandelier to work with the complex if the radio-controlled module fails. After all, the battery may suddenly run out or the remote control will be lost by small children.
The installation process is not complicated, since all the electronics are hidden inside the case, it remains to connect two wires. The quality of the control unit directly depends on the cost of the product, therefore, in order for the device to serve for a long time, it is better to choose a model of a higher price category.