Be surprised: we will discuss how to connect a motion sensor to a light bulb, we will give advice on finalizing the circuit. We noticed that it is tiring when you have to pull the "land" on this branch, you can save money by doing otherwise. It happens that the block breaks, there is no desire to buy a new one, but there is an opportunity to get to know the device closely. Let us describe the approximate composition of complex modules that are tuned to the level of illumination, sensitivity, the duration of sticking of the relay contacts (the time during which the light will be on while there is no movement).
Motion sensor: purpose
Sensor coverage area
How to connect motion sensor. Let's call the motion sensor a complicated version of light sensors, one body is able to combine the functions of both. It is used mainly so as not to look for the illumination switch in the dark. When a moving object of any category approaches, the sensor supplies power to the lighting. The control is carried out by the phase. It is supposed according to safety precautions, implemented by the scheme.
Before servicing the system, replacing light bulbs, take the trouble to turn off the circuit breakers, the motion sensor can supply power every second if the specified conditions are met.
Characteristics of motion sensors
The motion sensor is installed to turn on the light, the first digit is the maximum load power. The typical value of the parameter is 40 W, clearly below the Ilyich bulb. The scheme for connecting the motion sensor to the spotlight is determined by the number of wires. Let's explain the difference below. Characteristics of motion sensors are divided into groups.
The number of monitored parameters will allow you to assess the scope of the device. Although called a motion sensor, it is configured to react according to the following categories of parameters:
You see, a good device is designed to cover all occasions, even a bad one contains at least two settings: general lighting brightness, timer. We discard the sensitivity, the microphone is considered a refinement at all. The brightness of the lighting will allow you to achieve operation only in the dark. When connecting the motion sensor, take the trouble to set the regulator correctly. One end is marked with the Moon, the other with the Sun. We'll have to conduct a full-scale experiment, figuratively speaking. Wait for the right time of day, start playing with the settings.
Motion sensors
You can set the turn-off time during the day. The scale is devoid of graduation, it will take hours to navigate. With regard to sensitivity, it determines the degree of change in illumination. The main thing is not to miscalculate, if the Moon went behind a cloud, the illumination would not turn on. It happened - avoid being surprised, start adjusting the sensitivity of the sensor (variable resistor) straight away. What to do if the setting is missing, you need to change it. The store will refuse to return a fully functional device that decided to catch the moon. Hmmm... sleepwalking.
Motion sensor device: change settings not provided by the manufacturer
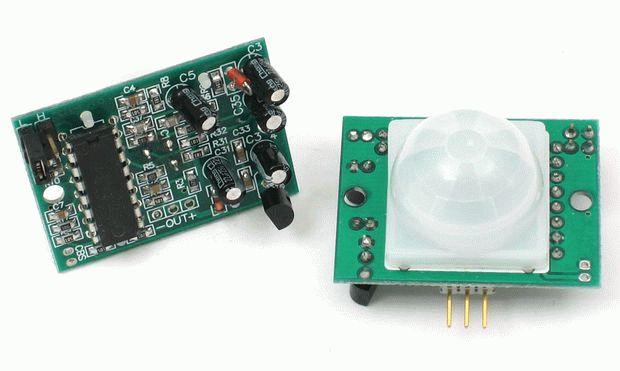
Before connecting the motion sensor to the spotlight, we decided to check it, it turned out that it was not working correctly. We will open the device to modify it, the seller will notice, goodbye warranty. The contraption is inexpensive, the soldering iron is in store at home, let's close our eyes to the possibility of losing chic after-sales service. Below we describe the principles of operation of the motion sensor in detail.
- It starts with getting food. The motion sensor is supplied with a neutral wire. There are models without it, the local shared bus is simply used inside. More often, there is a transformer at the input that lowers the voltage, which provides current decoupling from the source (switchboard of the house). Need a neutral wire - close the primary winding. An alternative option is to put a diode bridge, inside there is a common bus. Following the rectifier is a voltage converter. A microcircuit, the input of which is supplied with an unstable denomination, a decent supply of the motion sensor filling is removed from the output.
- The relay is supplied with a rectified voltage, the "ground" is broken by one or two transistor valves. It is powerless to turn on the light. It is available to modify the device by placing an additional toggle switch on the ground (not power) path. If a collision occurs, the motion sensor turns off if necessary.
- A phototransistor is placed as a sensitive element that recognizes movement. Let's call the task the definition of a change in the flow. The mode is set, a positive or negative pulse is formed at the output.
- The heart of the motion sensor is a module composed of several operational amplifiers. The number is equal to the number of features.
The determination of the total illumination occurs by setting the operating points of the key transistors using a photoresistor, a variable resistor. Together, they determine the threshold. Preliminarily work the circuit around the clock (it is recommended to cover the pupil of the sensor with a cap during the daytime), allows you to set the conditions for choosing whether the relay will work or not.
You see, everything is as simple as two and two. Avoid clarifying the physical basis of the operation of the Hall sensor by debugging the circuit. We can change the settings of the scheme, some of the elements at our discretion. The key ones are a relay configured to operate from a certain voltage, and a microcircuit with operational amplifiers. By increasing the capacitance of the charging capacitor, we can extend the timeout. Other parameters are subject to change.
First stage function
The first stage is separated from the sensing element by a capacitor. It is necessary that changes in the photon flux were received at the input: as soon as the movement stops, the stage interrupts the work. The resumption of spatial variations repeats the cycle. The cascade is switched off if there are no changes outside.
Second stage function
The second stage determines the sensitivity. It receives the signal of the first operational amplifier, is regulated over a wide range by a variable resistor, a feedback circuit.
Third stage function
The third cascade receives positive and negative pulses separately at the inputs, leveling the difference. The device does not care whether the photon flux decreases or increases, the movement would be caught. The cascade charges the polar capacitor (leveling is performed), which gives off energy through the resistor, determining the system shutdown timeout. The voltage will serve as the input characteristic of the finishing stage.
Fourth stage function
The fourth stage of the operational amplifiers generates a voltage that opens the key transistors, through which the circuit ground is applied to the relay.
Motion sensor installation process
The scheme for connecting the motion sensor to the searchlight is determined by the design. There are versions with two and three wires:
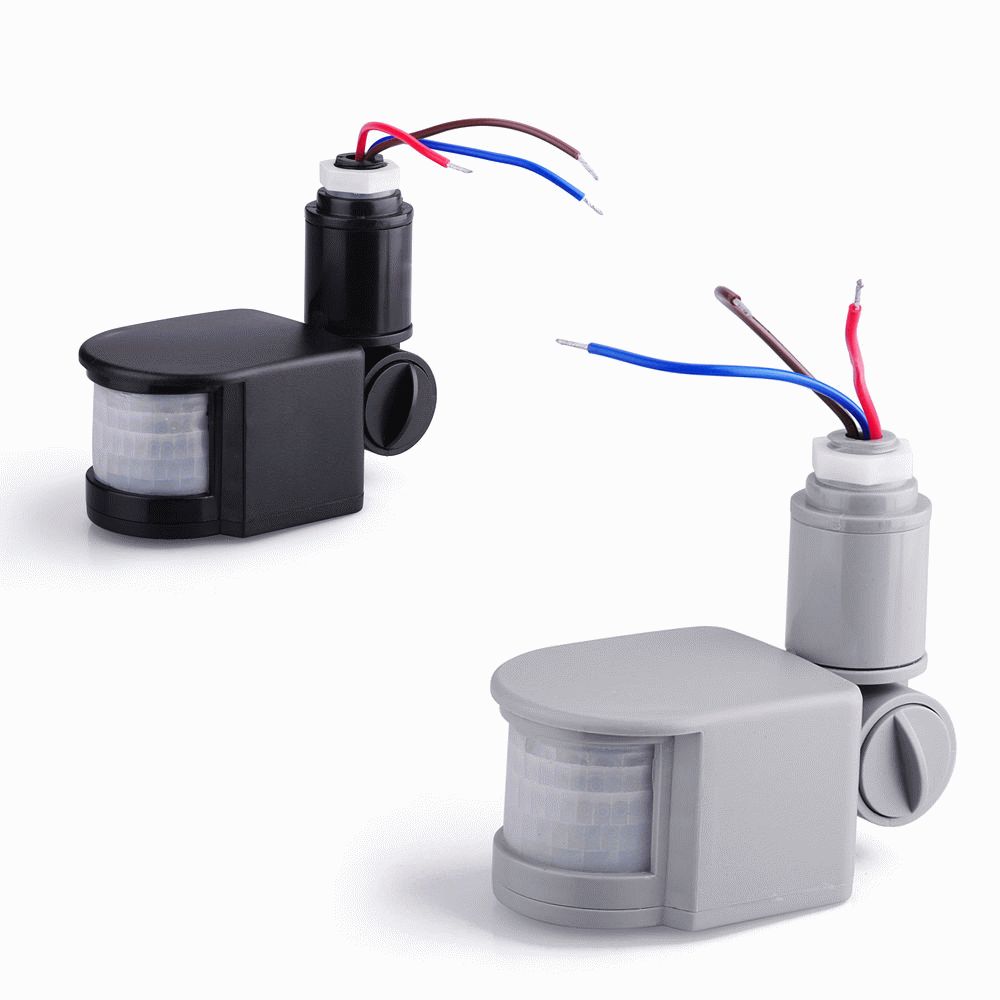
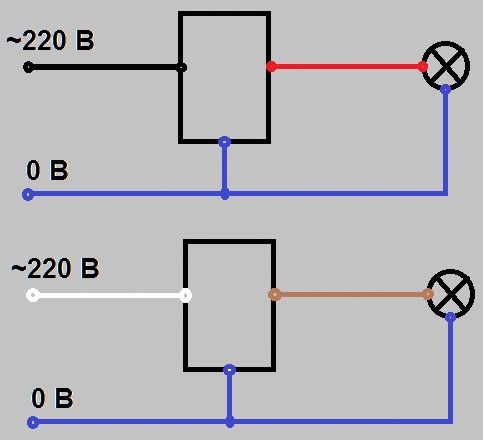
- Three wires are painted red, blue, black. The first is used to supply phase to the lamps, blue is the circuit ground, black supplies 230 volt power to the motion sensor. Nature provided a different coloring: a brown analogue of red, supplies a phase to the illumination, blue is the ground, white brings 230 volts to the sensor. To make it easier to understand, we put a picture next to it (for reference, read the instructions for more details), the colors show a schematic alignment.
- Two wires when ground is not needed for the sensor to function. Devices are put instead of switches due to features. There are wires of different colors, you need to navigate the sensor instructions.
Among other things, the colored wires can be easily undocked, you can put your own colors without problems. Helps to navigate. Grounding to the motion sensor is rarely supplied, read as a minor drawback. In the figure, the lighting motion sensor connection diagram is given in two versions for different braid colors. It's about three wires. The connection of the motion sensor for lighting with two wires was not considered, the connection is extremely simple: the device is placed in a phase break. The color of the cores is mounted according to the instructions.
We believe that now each reader will install a motion sensor, the mission of the authors of the VashTekhnik portal is completed.