In the process of installing an electric underfloor heating, the most time-consuming is the connection to the power supply. Directly installing floors with your own hands is not difficult even for beginners, but if the connection of the infrared floor heating, either cable or rod, is not done correctly, the system will not perform its functions or will fail. You should pay attention to the grounding device, otherwise the system will "beat" with current.
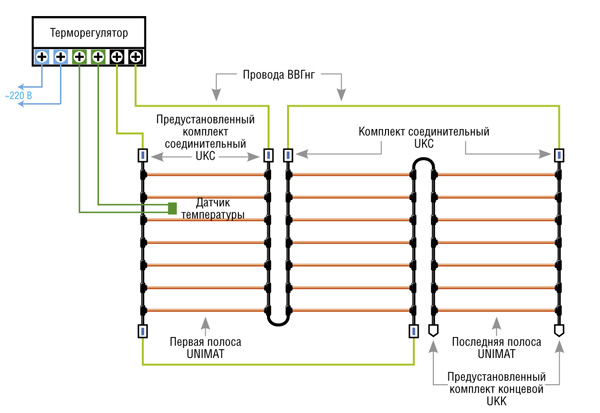
Electric underfloor heating requires the installation of a thermostat. This device is needed to maintain a stable set temperature in the room. The thermostat turns the floors off and on according to the readings of the temperature sensor.
Connecting a warm floor is possible without using a thermostat. However, in this case, you will have to manually organize the mode of operation of the system. First, it's inconvenient; secondly, homeowners lose the following benefits:
- Maintaining the set temperature in automatic mode;
- Floor heating at certain time intervals;
- Energy saving;
- Maintaining a comfortable temperature around the clock.
When choosing a thermostat, you need to take into account the power consumption of the underfloor heating system. Typically, devices with a power of 3 kV are used. You can connect the device directly to the shield or through a socket. Instructions are always attached to the device in what order to connect the power wires, as well as grounding, phase and zero.
The thermostat is placed at a distance of 1.2-1.5 m from the floor. Some types of regulators can be installed lower - about 30 cm from the surface, they are usually equipped with ultra-sensitive thermal sensors.
Connection via socket

Shield connection
If the thermostat is intended for operation in a large room (20 sq. M. or more), then the masters recommend installing the device on a separate power line. In case of connection directly through the shield, the scheme of action is similar to that described above (ground, phase and zero wires), with the difference that the installation of an RCD (residual current device) is required. The RCD is installed in the shield. After fixing the thermostat, the procedure for connecting a warm floor follows.
Connecting a warm floor without using a thermostat
It is possible to install underfloor heating without using a thermostat. In this case, usually, the heating wire is connected to a dedicated line and, with the help of an RCD, the floors operate in on / off mode. Simply put, you will have to constantly monitor the system with your own hands. During "manual" operation, power consumption increases significantly. In addition, the problem of grounding will have to be solved.
Connecting a film infrared floor heating to a thermostat with your own hands
H2_2Electric floor heating connection diagram:
- Each infrared film mat is cut to the required length and rolled out towards the wall on which the thermostat is installed.
- Glue the joints of the IR sheets with adhesive tape not reaching the edges of 10-20 cm. The thermal substrate should also be a single sheet with glued joints.
- Place one end of the terminal between the layers of IR film. The other end of each terminal must be at the top, on the side of the copper bar.
- Clamp the terminals with pliers.
- Take a single-core wire and connect to the terminal, clamp with pliers.
- Connect each heating IR mat in series so that the “phase” and “zero” are connected to the thermostat with two wires. Then ground is connected.
- Seal the terminals with bituminous tape.
- Also insulate the ends of the copper bars on the other side of the IR film strip.
- In order for the surface of the finish coating to lie as evenly as possible, it is necessary to make holes in the insulating layer and “drown” the connections of the terminals with wires in them.
- Connect the temperature sensor wire to the thermostat.
- Fix the sensor to the back side of the IR film using adhesive tape.
- Check system operation.
- The procedure for installing an infrared film floor can be considered complete. Next, linoleum, laminate, etc. are laid.
Advice! It is highly recommended to use a dense foam thermal underlay before laying the IR floor. It is convenient to make holes and grooves in such material so that wires and junctions can be hidden. The heating film mat will turn out “smooth” and the finish coat will lie perfectly.
Do-it-yourself connection of a rod underfloor heating
 Rod floor is a type of IR heating system. It consists of mats on which parallel rods made of carbon, copper and silver are fixed. Unlike film floors, a single-core wire connects the rods together like a rope ladder. DIY connection instructions:
- Lay out each mat parallel to each other.
- Connect the wires in series using a thermowell, insulate with a heat-shrinkable tube and “bake” the connection with a building hair dryer.
- Fasten each heating mat with adhesive tape to the floor, previously covered with heat-reflecting material.
- Connect the wire of the first mat to the thermostat.
- Install the temperature sensor between the two carbon rods of the middle mat.
- Connect the sensor to the thermostat.
- Check system performance.
- Fill the core floor with a screed or you can lay ceramic tiles on top.
Advice! For high-quality adhesion of the finishing screed and the rough surface, it is necessary to make rectangular holes in the heat-reflecting material. For each square meter - 3-4 cutouts.
A ground wire is also connected to the thermostat. Usually, manufacturers attach detailed instructions to the device, where everything is clearly described.
Do-it-yourself cable floor connection
 Installation of the cable floor should begin with the laying of thermal insulation. The material can be spread directly on the screed or hidden in a self-leveling self-leveling floor layer. There are 2 options for cable underfloor heating: in the form of a separate wire or it is a mat with a cable attached to it. Reinforced mesh is used as roll material.
Floor installation as a separate cable:
- Lay a special metal tape across the room in 50 cm increments, fix with screws (you can use nails).
- Lay the cable according to a pre-designed scheme, avoiding areas under furniture. The turns should not intersect with each other, the pitch is 25 cm.
- Fix the cable on the mounting tape (special clips-brackets are provided in it).
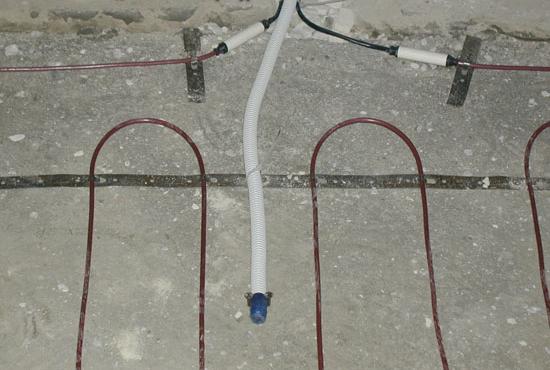
- A thermal sensor is installed between the cable lines, the wire of which is laid in the corrugation.
- One end of the cable is insulated. The incoming end, the temperature sensor wire, zero, phase and ground wire are connected to the thermostat.
- Control check of the system.
- Concrete or leveling mixture is poured on top of the system, or tiles are glued.
The heating mat is connected in the same way, but there is one important nuance. The cable must not be cut! You can only cut the mesh it is attached to. Therefore, you will have to calculate in advance where the cuts of the mat will be and in which direction to deploy its parts. Further, everything is as described above: connecting the cable directly to the thermostat, wires of the phase, zero, sensor and ground.