The process of installing underfloor heating involves the installation of heating elements and the connection of a warm floor. Connection to the network is carried out through a thermostat. It is actually a link that controls the heating mode. After processing the information received from the temperature sensors, the thermostat either turns on or off the heating.
Connecting an electric underfloor heating comes down to practically connecting it to electricity and a thermostat. I must say that these operations are so simple that you can safely perform them yourself, although, like in any other business, there are secrets here. Let's try to understand all the nuances.
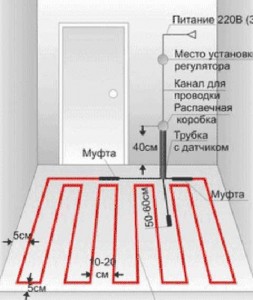
Wiring diagram
The installation of underfloor heating systems depends on parameters such as the specifics of the premises and the type of heating elements used. The most common:
- - it is a securely insulated cable with high resistivity, which generates heat when an electric current passes;
- - differs from the previous one only in that the cable is already mounted on a special nylon mesh;
- - a thin film of a special composition with embedded carbon strips, which serve as a heating element.
In any embodiment, they have three main components:
- heating, as already noted;
- intermediate, consisting of a coupling through which the cold end of the heating elements enters the mounting box - it is installed on the wall;
- control, the main components of which are a temperature sensor installed through a corrugated tube and a thermostat.
Principles of operation and connection of the thermostat
According to their design, thermostats are classified into complex electronic ones with programmable control and simple mechanical ones. In the latter, unlike electronic ones, equipped with an electric unit and a display, only the temperature is set mechanically. However, despite the variety of devices, the circuit diagram for connecting the underfloor heating controller is very similar. There is no danger of making a mistake, since the specific scheme of each of them is indicated on the case.
The switching power of the device must correspond to the selected heating system.
According to modern standards, the maximum allowable power of the thermostat is taken equal to 3 kW.
The main function of the thermostat is to maintain a constant temperature in the system. Having received information from the temperature sensor that the required limit has been reached, it automatically turns off the power. At the same time, the thermostat and temperature sensor continue to work. As soon as the sensor gives a signal about a change in the temperature regime, the regulator will immediately turn on the power.
In a warm field with water heating, the installation of a thermostat is optional. Nevertheless, it is recommended to include it in the system if the economy mode is important or the room is heated from several sources.
Installing a thermostat
The thermostat is mounted on the wall at least 1.5 m above the floor level. The device is connected to the power supply either from the shield or through the socket, but for both options, the prerequisite is the presence of an additional circuit breaker connected to the network, which should work in an emergency, whether it is a breakdown, overheating or short circuit.
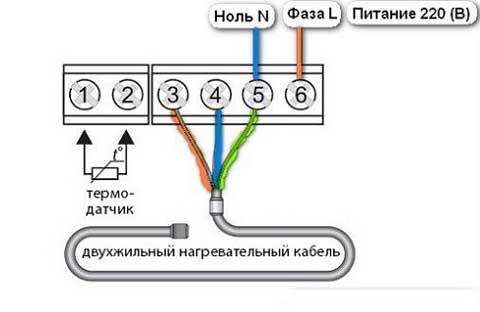
On the side of the thermostat there are “nests” where power cables, temperature sensor wires and cold ends of the heating cable are connected. As a rule, the connection diagram is shown on the device, which, of course, greatly simplifies installation. If there is no scheme, then they act according to the standard:
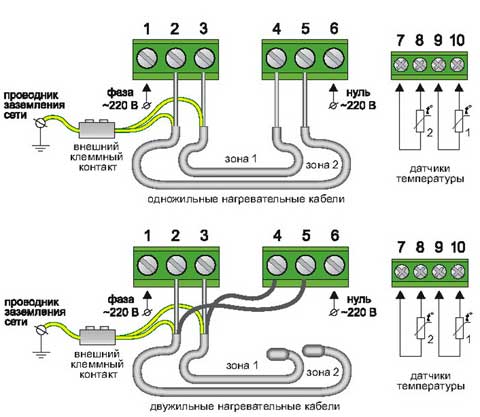
- terminal No. 1 - network phase;
- No. 2 - network zero;
- Nos. 3, 4 - conductors of the heating cable;
- No. 5 - timer;
- No. 6, 7 - floor temperature sensor.
It is useful to know that all lead wires have different color markings for:
L phase - white (black, brown),
N zero - blue,
"Earth" - yellow-green.
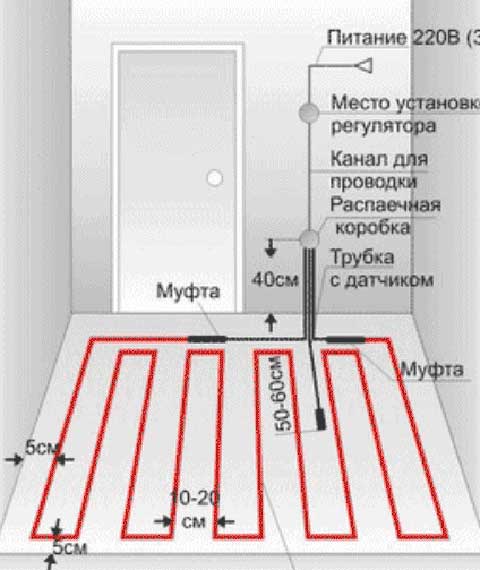
To connect the floor to the thermostat in the wall, you will need to cut a shallow ditch. Two PVC tubes will pass through it - one for the cold ends of the heating element, the other for the temperature sensor.
Connection options for different types of systems
We note right away that it is more convenient to work with a cable with two current-carrying conductors than with a single-core design, since only one end of it is connected to the thermostat.
Differences in heating elements dictate some connection features.
Cable underfloor heating
 When laying the cable floor, both single and twin-core heating elements are used. Accordingly, the schemes differ slightly in the nuances of connecting to a thermostat, but otherwise the installation principle is the same.
And now about the process itself. To begin with, the base is leveled, a layer of thermal insulation is laid and. Even before the start of installation, the power wires must be stretched to the location of the thermostat with the expectation that the coupling will remain in the body of the screed as a result. The next steps are:
- the mounting tape is laid on a heat-insulating layer or directly on top of the subfloor, unless, of course, there is a warm room under it;
- the cable is evenly laid out along the fasteners of the tape;
- install the sensor in the corrugated tube;
- check the resistance of the cable, it must correspond to the value indicated in the passport - for this you need a tester;
- pour the screed and wait for it to harden;
- activate the system by connecting the electrical wiring, supply wires from the temperature sensor and heating sections using screw clamps.
The best cable layout option is a snake. When choosing another method, make sure that its lines do not intersect.
Thermomat
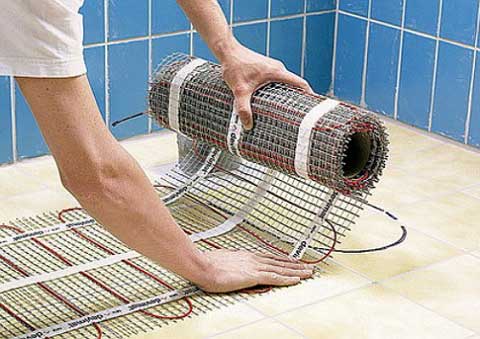
Thermomats are a type of heating cable, so the installation approach for both systems is quite similar. Of course, mats are easier to work with. Several factors contribute to this: there is no thermal insulation, the screed is poured in a thin layer, etc. That is, there is a clear saving on building materials, the required amount of work. It is impossible not to note the minimum rise in floor height as a virtue.
If, when connecting the heating mats to the thermostat, the length of the cold ends is not enough, then the missing part is cut out from the heating mat. The coupling remains inside the screed.
Film floor heating
This is a modern model of underfloor heating, where bimetallic or carbon elements act as a heating element. Connect it to the network through copper conductors passing along the edges of the heating film. The floor is laid on a special substrate, usually made of reflective material, which is rolled out on the base. Film sheets are connected in parallel. In the latter, one of the pair of conductive strips is attached to the previous one, and the second is soldered to the terminals and led to the thermostat.
And in this case, the connection of the underfloor heating sensor is also carried out in a plastic corrugated tube (16 mm). It is placed either in a groove made in the floor, or the device is fixed on the surface of the film. Where the wall goes into the floor, it is necessary to provide as much bending as possible, then the cable will be located freely in the tube. To prevent moisture from entering the tube, it must be muffled from the end.
Without sufficient knowledge of electrical engineering and skills in handling the relevant equipment, you cannot independently change the control scheme. In particular, you cannot:
- change the length of the heating section of the cable;
- connect directly the ends of the heating cable to the mains;
- connect an unwound heating cable;
- place the cable under stationary pieces of furniture;
- repair the system yourself.