Warm floors are increasingly used in private houses and apartments. They help to get the temperature that is optimal and comfortable for a person. The stores sell both separate components for underfloor heating, and ready-made kits. Mounting a warm floor is not so difficult. This task can be handled by a home master. One of the most important stage of installation is connecting the floor to the control system - the thermostat. We will tell you how to connect a warm floor to a thermostat correctly.
Underfloor heating can be water or electric. In water heated floors, the heating element is pipes with hot water supplied from the heating system. The power source of electric floors is one, however, they are distinguished by the heating elements used: cable or film.
The heating element can be:
- one- or two-core heating resistive cable;
- self-regulating cable;
- heating film (bimetallic or carbon);
- carbon rods.
Temperature controller: purpose, types and methods of connection
The underfloor heating system is controlled by a thermostat. Manufacturers offer two types of thermostats:
- Mechanical. The temperature that they want to maintain in the house is set using a mechanical rheostat.
- Electronic. They work on the basis of a programming device. There are touch and push buttons. The operation of the system through such a thermostat is initiated at a specified time and according to specified temperature indicators.
Types of thermostats
Thermostats are installed at a height of about 1.5 meters from the floor surface. The place where the thermostat is to be installed must be protected from direct sunlight and any additional heat sources. The thermostat is connected permanently, powered from the electrical panel or through sockets already in the room.
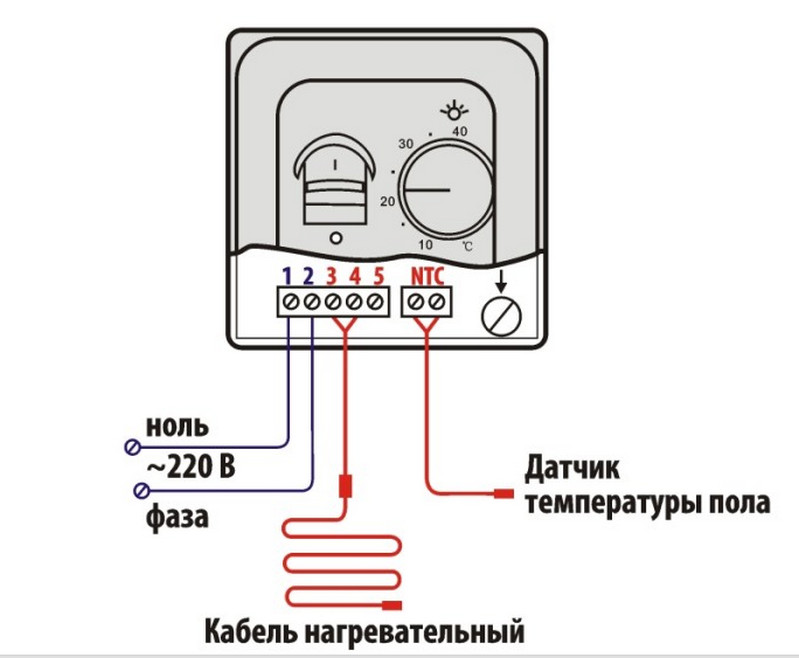
Usually, the manufacturer draws a connection diagram on the thermostat housing. This allows the home master to connect this device himself.
Connecting a thermostat
Regardless of the type, thermostats are designed to control the following types of electric heating elements:
- heating cable. This is a high resistance conductor. It is placed in reliable isolation. When current is passed through, the cable heats up.
- Thermal mat. This device uses the same high impedance cable, but it is attached to a matte film with a pre-set pitch.
- Special film that emits infrared rays. The thickness of such a film is not more than 5 mm. A semiconductor flat heating strip is installed in its layer.
If underfloor heating is installed in several rooms, then it is more advisable to put thermostats on each heating circuit. This will protect the electrical network from overloads, allow you to use different operating modes for different rooms and turn on the systems independently of each other.
Mounting the thermostat
After installing the thermostat, a phase is connected to the junction box, and zero and ground are also connected. A groove must be made in the wall into which plastic tubes are placed. The power wires of the heating cable are laid in one of them, and the wire from the sensor is placed in the other. The sensor is placed under the floor finish. After that, you can proceed to the installation and connection of the electric floor.
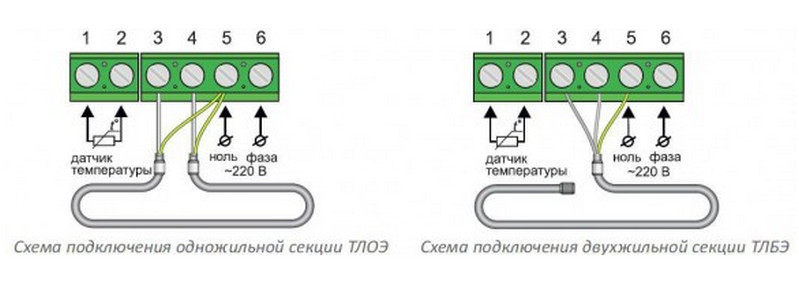
The difference between the connection scheme for a single-core underfloor heating and the two-core scheme
Scheme of connecting a warm floor to a thermostat
The scheme for connecting a warm floor is selected depending on the type of floor.
Cable floor connection
Before installing the cable, the floor is leveled by one of the methods, depending on its type. Before laying the cable, it is necessary to stretch the power wires to the thermostat. The diagram below shows that the coupling will be in the floor screed after installation is completed. A mounting tape is laid out on the surface of the subfloor, which will help fix the cable. Most often, the cable is laid with a snake or snail.
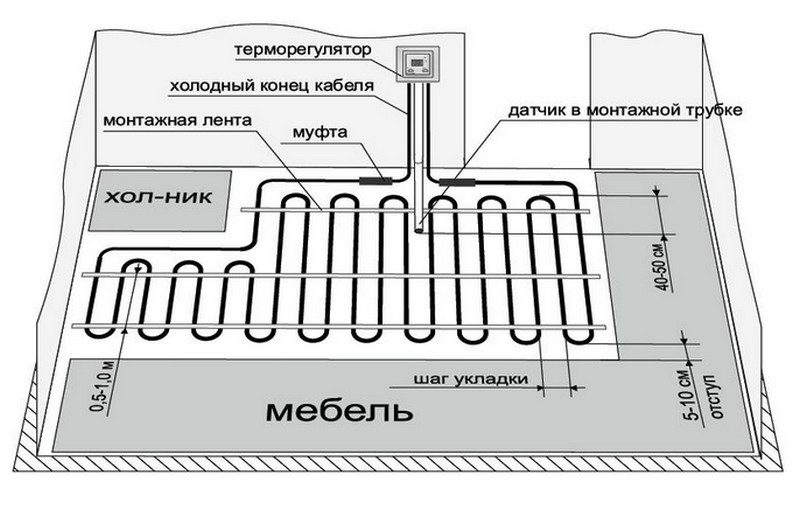
An example of installing a heating cable for underfloor heating
Should be taken into account! When laying a warm floor, the intersection of cable sections should not be allowed.
After laying the cable, the sensor placed in a plastic tube is installed. Using a special tester, the quality of the installation and the compliance of the cable resistance with the passport data are checked. Underfloor heating ready for screed.
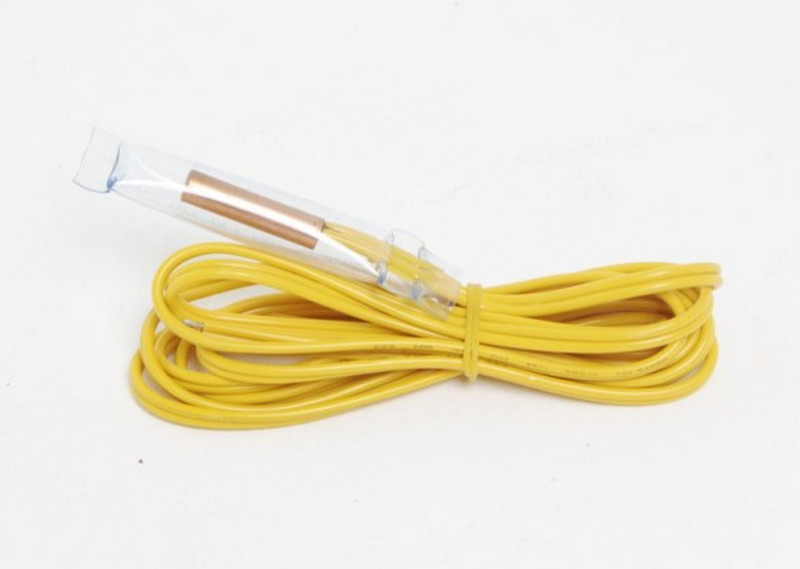
Floor temperature sensor
Depending on the type of screed used, the floor is kept until completely hardened. Only after that it is possible to attach all the wires to the thermostat. Screw terminals are used for connection.
Connection of thermal mats
The principle of connecting thermal mats differs little from a similar process for a cable floor. Let's just focus on the differences.
A thermal mat is the same cable, but fixed with a certain pitch on a heat-resistant film. This makes installation easier. The film with the cable is laid out on the prepared floor base and poured with mortar or tile adhesive. After that, the finish coating is mounted. Thermal insulation for this type of floor is not used to avoid overheating of the system.
In finished form, this design has a thickness of no more than one and a half centimeters. In order to place the sensor in such a floor, it is necessary to make a recess on the surface.
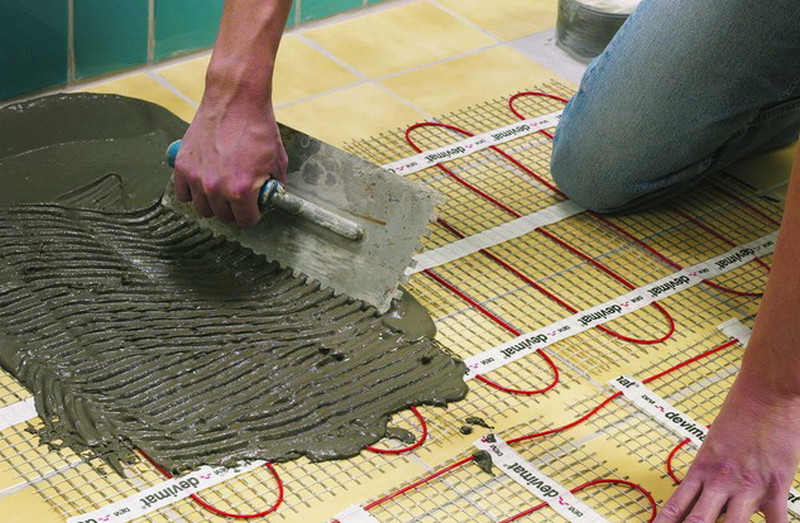
Applying screed to thermal mats
Sometimes there are not enough so-called cold ends to connect the mats to the thermostat. In this case, a piece of cable is cut out of the mat. The coupling is filled with a coupler.
Installation of this type of floor provides significant savings in materials: thermal insulation, screed, fasteners. In addition, the amount of work is also significantly reduced. Such a system has practically no restrictions in use, since it slightly raises the floor surface and can be used in rooms with low ceilings.
Film floor connection
The basis of the film floor is carbon or bimetallic heating elements sealed into a heat-resistant film. Along the edge of the heating film are copper conductors, through which the system is connected to the mains.
A foil-coated substrate must be laid under the heating film, which will reflect infrared rays towards the room. In this case, a plastic tube with a sensor is placed in a recess made or attached to the surface of the film.
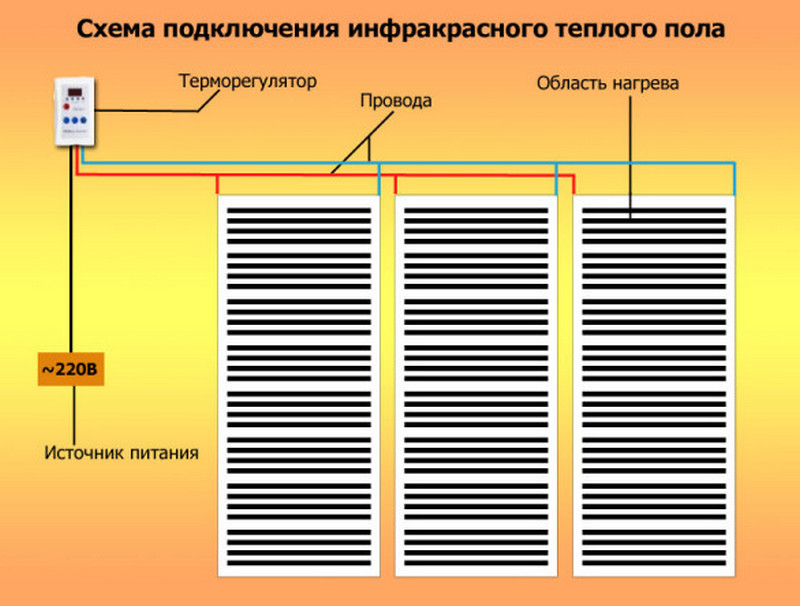
Infrared floor heating connection diagram - standard installation
If necessary, the film can be cut along special lines. On the one hand, the conductive strips are insulated, and on the other, they are left open for the possibility of connecting to wires. The film strips are laid out and connected to one another in parallel.
Such a warm floor is the most versatile, as it can be mounted under any floor covering.
Connecting a water heated floor
The scheme of a water heated floor is slightly different from an electric floor. First of all, you need to determine the connection method.
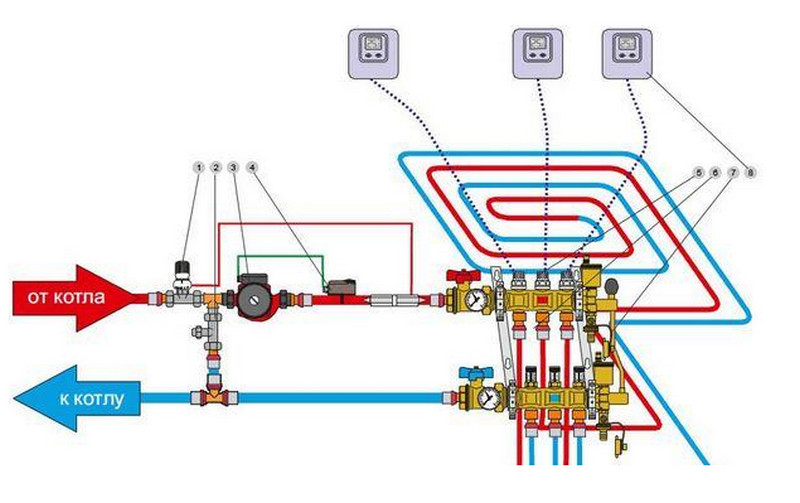
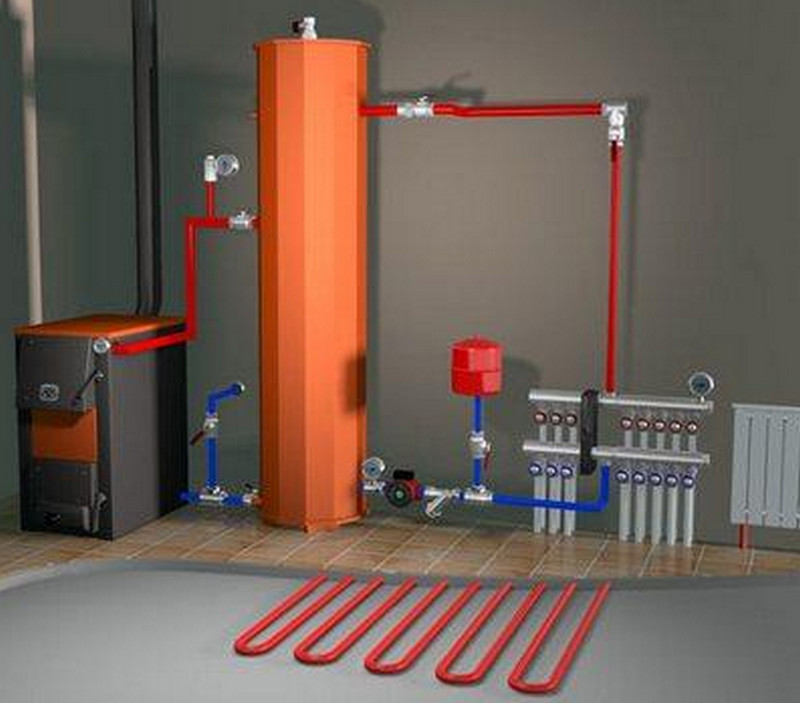
Underfloor heating with hydraulic separator
An important stage in the installation of a warm water floor is the installation of a water collector. All circuits of the system are connected to this device. The manifold arrangement allows for individual regulation of pressure and temperature in each circuit.

Scheme of connecting a collector of a warm floor in a private house
A warm water floor can be an additional source of heating or used as an independent option. In the first option, radiators are installed on the forward stroke, and a warm floor is connected on the reverse.
The diagram below shows:
- Circulation pump.
- Heating radiators.
- Boiler.
- Storage tank.
- control device.
- Stopcocks.
![]()
Connecting a heated floor according to a combined scheme
Underfloor heating is increasingly being used in the residential sector. This pleasure is not cheap, but by doing the installation yourself, you can save a lot. The advice of our site will help you to perform a competent installation.