It is difficult to imagine modern life without the use of various electrical appliances. But their abundance creates problems when connecting and puts a high load on the electrical network, which drastically reduces fire safety. Separate control of electrical appliances can help reduce the load, for which an electrical panel is assembled and installed in the apartment. You can build it on your own. But so that electrical appliances can be turned on without fear, it is necessary to correctly draw up a diagram of the shield, understand its device, and take into account all installation requirements.
The selection of an electrical panel must be taken very seriously. After all, the safety of the house depends primarily on this, and then the comfortable use of appliances.
The following requirements are imposed on the electrical panel and its installation in accordance with GOSTs:
- the filling of the shield is carried out strictly according to the technical documentation. It will indicate the number of protective devices that can be installed, their rated current;
- the shield must be marked with a symbol of electrical safety, on which the rated voltage is indicated;
- The material used to make the shield must be non-flammable and non-conductive. It can be plastic or metal coated with a special paint;
- on the wires there must be a designation of the group of connected devices;
- the body and the door of the shield must be grounded. Eyelets for sealing should also be provided.
In addition to the selection of the shield, it is also necessary to draw up an electrical circuit of the shield. Competently compiling it will facilitate the assembly of the shield and its transfer, and there will be no problems when accepting work by an electrician.
Drawing up an electrical circuit
This step is required. And this is due to the following factors:
- when upgrading the power grid or repairing it, it will be possible to quickly determine which section each element is responsible for. This is also true if you plan to transfer the shield;
- in order for the electrician to accept the work performed, the presence of a circuit is mandatory;
- with the scheme, the assembly of the shield is much easier.
The scheme is drawn up in several stages:
- The power supply system of the house is determined.
- Electricity consumption points are divided into several groups.
- Based on these data, a scheme is formed.
The type of power supply depends on the way the shield is connected and grounded.
You can find out the type of power supply and grounding system at home by looking at the shield if it is being transferred, or by contacting the relevant authorities. In modern homes, the TN-S or TN-C-S system is more often used. A three-core copper wire is laid around the apartment, and a cable with three phases, zero and PE ground is connected to the switchboard on the floor.
In houses of old buildings, the TN-C system can be used, where a two-core aluminum and copper cable is laid around the apartment, and a cable with three phases and one residential PEN is connected to the switchboard, in which zero and earth are combined.
Breakdown of points of consumption can greatly facilitate installation work and save materials. Experts recommend dividing them into the following groups:
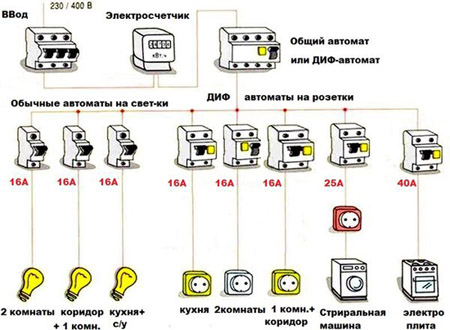
For different consumers, different machines are used:
- RCD 16A for switches;
- RCD for 16-20A for sockets;
- RCD 25A for household appliances;
- RCD 32-63A for electric stove.
You can draw up a diagram yourself if you have certain skills and knowledge in notation. But it is better to have it done by a qualified electrician. He will be able to take into account all the nuances.
Principles for selecting an electrical panel
The drawn up scheme allows you to estimate how many automatic machines, RCDs, etc. will be in the system. Modern shields are modular. To assemble the electrical panel in the apartment, elements that are multiples of 18 mm in width are used, that is, each module has a size of 18 mm. RCD or DIF-machine occupies two modules in width, and the machine takes one.
Principles for choosing an electrical panel:
- the size should be taken with a margin. This will allow later to transfer the shield to another place or upgrade the circuit without problems;
- the selection of the shield must be carried out taking into account the type of wiring. Allocate models for outdoor (overhead) or hidden wiring (embedded);
- it is advisable to give preference to plastic shields that are definitely not conductive.
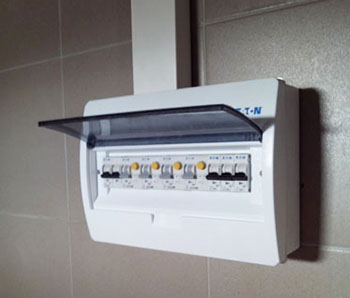
Installation of electrical panel in the apartment
If you are assembling the shield or moving it, then first of all you need to decide on the installation location. It is recommended to install it as close as possible to the place where the power supply enters the apartment.
It is important to ensure that it has unhindered access. Depending on the dimensions of the shield, the height of its installation is selected (1.4-1.7 m from the floor). You can navigate along the top row of machines, which, for ease of installation and further maintenance, should be located at eye level. The shield is installed in two ways:
- open - for invoice;
- hidden - for embedded.
Let's analyze each of them in more detail.
Installation of a hinged electrical panel
If the wiring was carried out in an open way, then it is advisable to use a hinged shield. It must be disassembled before installation.
There are four mounting holes on the back wall. In the absence of such, you need to drill them yourself. Having attached the shield to the wall at the desired height, you need to make markings for the first dowel. Then a hole is drilled under it, and the shield is screwed to the wall. With the help of the building level, the required position is set and markings are made for the rest of the fasteners. Then the shield is screwed to the wall completely.
Fasteners are selected taking into account the base material:
- when fixing on a metal or wooden rail, you need the appropriate screws;
- dowels 6x40 mm are enough for concrete or solid brick;
- on silicate brick - dowels 8x100 mm;
- on hollow brick - anchors with a length of at least 80 mm.
You can lead wires through special holes in the shield or cut one large one with a grinder.
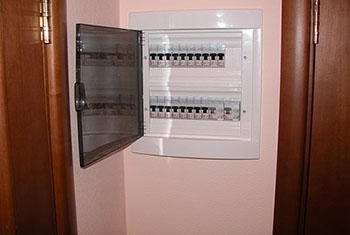
Installation of a built-in shield
When moving or installing a built-in electrical panel in an apartment, be prepared for the formation of a large amount of debris and dust. The complexity of such work is much higher, especially when arranging a niche in a concrete wall. Be careful not to damage the communications running in the wall.
If the walls are made of panels or drywall, then you need to take care of arranging a niche even at the cladding stage. A niche will need to be knocked out in a concrete or brick wall. In both cases, allowances of 2-3 cm are taken, including in depth.
The markup is done based on the size of the shield. The formation of a niche is carried out using a grinder with a circle of large diameter. With its help, a strobe is cut along the perimeter. Then, using a perforator around the perimeter, a large number of holes are drilled to the desired depth. After that, you can proceed to knocking out a niche by replacing the drill with a pike.
The shield box is fixed in the formed niche. Pre-marking holes for fasteners is made for it, and cables are wound up. If the shield is small, then you can fix it in a niche with alabaster.
Electrical assembly process
After installing the housing and inserting cables into it, the electrical panel can be assembled and connected. To do this, you must perform the following series of operations:
- First of all, 35 mm DIN rails are installed. They will install automatic machines, an electric meter, tires for connecting grounding conductors and neutral wires separately. They are fastened to the rail with a latch. It is designed in such a way that the elements can be moved freely.
- Then the required number of elements is installed in accordance with the diagram and two tires. The power cable is connected to the introductory machine, which is placed first on the top left. It is advisable to enter it from above for convenience.
- We connect the introductory machine. Phases are recommended to be connected from below, so that it is more convenient to put jumpers on top.
- After that, the automata are connected by jumpers and the assembly of the circuit begins in accordance with the circuit. Zero is taken from the zero bus for each machine separately. The yellow-green wire of the machine is connected to the ground bus. There, with the help of a copper wire, the body and the door of the metal case are connected.
In order not to be mistaken in the future, make the zero jumpers blue, and the phase jumpers different from it.
The transfer or installation of the electrical panel should be carried out only after turning off the power to the apartment. If you doubt your abilities, then it is better to entrust the assembly procedure to a specialist or do everything under his control.
After assembling the electrical panel, all that remains is to screw the cover and check the result by applying voltage.
In contact with