The electrical panel in the apartment, its importance in the power supply system of the house is extremely high. Wiring cannot
We mount the electrical panel ourselves
to function efficiently and fully without the correct distribution of consumers of electrical energy, and fire and electrical safety will be minimized in the absence of the necessary protection elements. Of course, it would be better if specialists will lay the wires and install the equipment, but with some study of this issue (this article will help you with this), you will be able to independently install the electrical panel yourself without much effort and cost, assembling a simple electrical circuit. The main thing is to figure out what power supply schemes are, what equipment you need to choose, how to calculate electrical loads, how to properly and evenly distribute them.
General questions about electrical panels
At the moment, there are two types of electrical panels. The first is an old and fading shield with fuses (or plugs), which were disposable and had to be unscrewed for replacement, and modern devices equipped with a system
mi batch switches (automatic). Of course, it is better to use modern technologies, as they are superior to outdated systems in terms of reliability, safety and durability, and they take up less space, but they are not repairable. In stores, you can buy shields with built-in circuit breakers, as well as empty "boxes" and already install the necessary equipment yourself.
The electrical panel in the apartment, the power supply scheme of which can be varied, and the number of consumers and their power can increase over time, should be selected with additional places for circuit breakers.
The introductory machine, usually capable of simultaneously turning off both the "phase" and "zero", must be selected based on the total load of the apartment. The value of its current and protective characteristics is higher than that of auxiliary automata. As a rule, for 2 and 3-room apartments, an automatic machine for 32-40 amperes (about 7 kW) is suitable, if the load is less, an automatic machine can be taken for 25 or 16 amperes.
As for the auxiliary machines installed on the "phase", they are necessary to protect a separate room or device. Experts advise installing such a machine for each consumer whose power exceeds 1.5 kW (heating tanks, washing machines, and so on). The table of approximate loads of electrical appliances is located below.
Table 1 - approximate power of household devices.
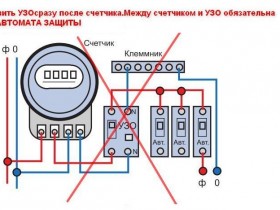 RCD power distribution
 RCD (residual current device), an extremely useful device if you need to increase the level of electrical protection at times. They react to the slightest leakage of currents and voltages, instantly de-energizing the circuit. If there are bathrooms and children's rooms in the house equipped with electrical appliances,
Mounting and device of the shield
There are two types of abb or legrand electric apartment shield: closed (built into the wall) and open (shield is attached directly to a vertical surface). The choice of the type of installation mainly depends on the type of electrical wiring - if the open-type wiring is ideal, the installation of an overhead shield, such a shield does not require special preparation of the place, fastening to the wall is carried out using ordinary dowel-nails or self-tapping screws (everything depends on the wall material) . If the wiring is hidden (i.e. built into the wall), then the best option would be to install a built-in shield. Everything is more complicated here, since you have to hollow out the walls, the main thing is not to forget to make sure that the thickness of the wall allows you to install the shield. After creating a niche, it is smeared with a fixing solution of gypsum or alabaster, and a “box” is already built into such a bed. The shield is more convenient to use plastic. The upper part should contain an introductory machine under which the counter is located. It is fastened with screws. The installation of the meter is carried out after the completion of work related to the electrical wiring device. It has to do with sealing.
Installation of the electrical panel should be carried out on a hard surface where it is easy to reach and maintain.
The location of the shield is determined by the standards, away from the pipelines of water and gas. It should be located on a flat wall surface with an inclination of no more than 1.5 degrees at a height of about 1.5 m from the floor. If it is not possible to locate the meter far from the places of potential damage, then it can be placed in a cabinet equipped with a viewing window. Fastening wires is allowed using bandage knitting.
For wiring in the attic, it is necessary to leave the wire of a short length, because twisting the wire into a bay is not allowed. If you are installing electrical wiring in the attic, the cable is placed in a metal pipe with grounding.
As for the materials from which the shields are made, it can be either metal or heat-resistant plastic. The second option is more convenient in installation and operation, safer, and its appearance is attractive.
So, with the installation of the box itself, we dismantled it, now let's figure out how the circuit of the electrical panel is arranged. 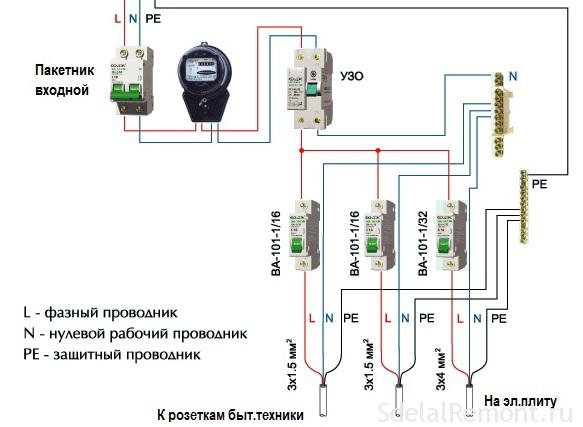
In principle, all electrical circuits of shields are of the same type, but there are main factors by which they are assembled, these include:
- The number of consumers of electrical energy;
- total power consumption of electrical energy;
- power of each consumer;
- the place of installation of the electrical panel;
- number of phases;
- the presence of a grounding conductor;
- the presence of a metering station for electric energy.
The voltage is supplied to the introductory machine (it is better if it is two-pole) and goes to a single-phase electricity metering unit, from where it goes to the RCD. Then there is phase splitting and direct distribution of loads using circuit breakers and additional RCDs. For example, there will be separate machines for lighting, sockets and powerful consumers.
The device of the electrical panel with a three-phase power supply system is similar, only the introductory machine, RCD and electric meter will be three-phase, and the whole system will be larger both in terms of dimensions and in the number of machines and connecting conductors.
Starting interior installation
Now let's figure out how to properly assemble the electrical shield. First of all, in the shield, with the help of self-tapping screws, a DIN rail is installed. From itself, it is a metal plate, to which all switching devices will subsequently be attached. To create the required length, it can be easily sawn with a hacksaw for metal.
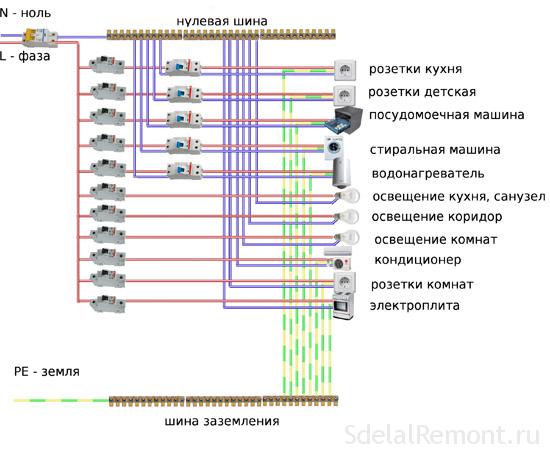
In addition to DIN-rails, terminal blocks are attached to the shield body (in a different way, distribution busbars). Their role is to connect neutral conductors. If an old-style apartment or house and the entire system is made only with a phase (3 phases) and a working zero (performed by a blue wire), one terminal block is enough. If the system is made according to the rules and there is an additional yellow-green conductor (protective zero or ground), then another bus must be installed. At this point in time, there are tires on sale, the design of which allows them to be mounted on a DIN rail, like machines.
After mounting the DIN rails, we proceed to fixing the circuit breakers. The modern design will allow you to do this very quickly, just pull the latch device on the top side of the machine with a flat screwdriver, put the machine on the DIN rail and remove the screwdriver. Removal is carried out in the same way.
Assembly instructions
The connection can be made in three ways:
With the help of stranded copper wires with sleeve lugs of the NShVI type.
Make U-shaped jumpers with your own hands from pieces of copper wire.
With the help of special insulated tires, called combs. Such a bus is convenient in terms of installation and does not take up much space, plus several times reduces the number of connecting wires.
Following actions
After all the necessary steps for assembling the electrical panel have been completed, they proceed to cutting and connecting the conductors.
1. With cutting, everything is simple - we clean off excess insulation with a knife. 2. After removal, it is advisable to solder the bare ends or equip them with special crimps, which are also better to solder.
3. We make the connection of wires to the machines - the terminals must be well tightened with a screwdriver, weak contact will subsequently lead to heating and destruction of current-carrying parts.
4. The grounding conductor always goes past the machines directly from the grounding bus.
5. The neutral conductor is connected to the zero bus. If a conventional machine is used as protection (except for the input one), zero goes directly, if protection is performed by an RCD, zero goes through it to the connected line. 
What else do you need to know?
Electrical panel installation and assembly – it is not only the ability to correctly assemble circuits. You also need to know some of the nuances, so as not to regret the time and effort spent later.
It must be recalled that it is necessary to assemble and install the Legrand, ABB electrical panel or equipment from another company strictly on a disconnected power line, after checking the absence of voltage.
To connect the assembled shield to the existing system, it is necessary to involve employees of the relevant organizations. For apartment buildings, these are representatives of the HOA or housing office.
As a result, after the end of the entire assembly and connection process, you need to close or screw the cover and check your work by applying voltage to the current-carrying parts of your shield.
(No ratings yet)